
 Updated - Click on the pictures to enlarge.
Notice the little red "wall" with the white hearts on it? That's the secret. You want to build yourself a little "wall" that is the exact seam allowance width away from the needle that you need. Mine is a fancy little wall that you can get at quilt shops - I got it in a goodie bag. A built up wall of masking tape works fine - that's what I used for years. A piece of moleskin or other "foot stuff" that has a sticky side works well. Many people use a pad of Post-It's that they've
 ripped off so it's just the right height. You want it tall enough so you can easily butt the edge of your fabric right up next to it but not so tall that any pins you have in the block won't glide over the top of it. You'll sew your seam as much by feel as by sight - my fingertips have become very sensitive as to whether or not the fabric is just touching the edge of the wall as I sew.
 Notice the wall starts considerably in front of the presser
 foot. That's the problem with 1/4" feet - the fabric needs to be in the right position in front of the foot in addition to under the foot. That way you know it is going straight through and not at an angle. If your feed dogs get in the way of your "wall" - which may very well happen on a zigzag machine, just cut square notch out of the "wall" to expose the feed dogs at that spot. If you have a featherweight, make sure it doesn't extend over the gold
 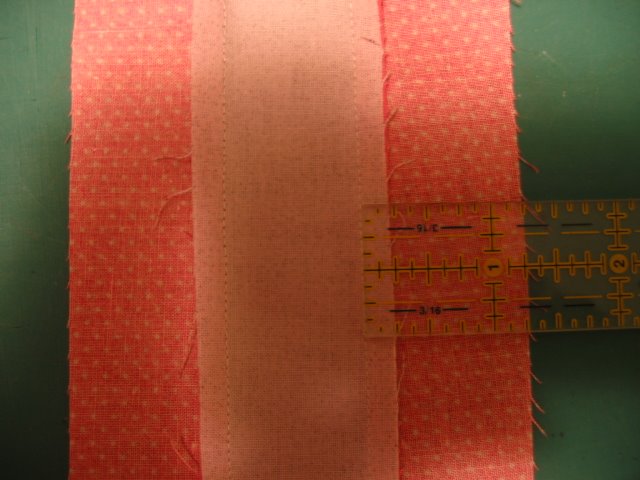 paint as it will eventually cause the paint to flake off.
Position a ruler under your presser foot, and drop the needle so it touches the far right edge of the 1/4" line. Make sure the ruler is straight front to back, then drop the presser foot. While the ruler is in place build your "wall" so it is exactly next to the edge of the ruler. Make it a fat 1/8" tall, or a little taller. 1/4" is too tall. Remove the ruler.
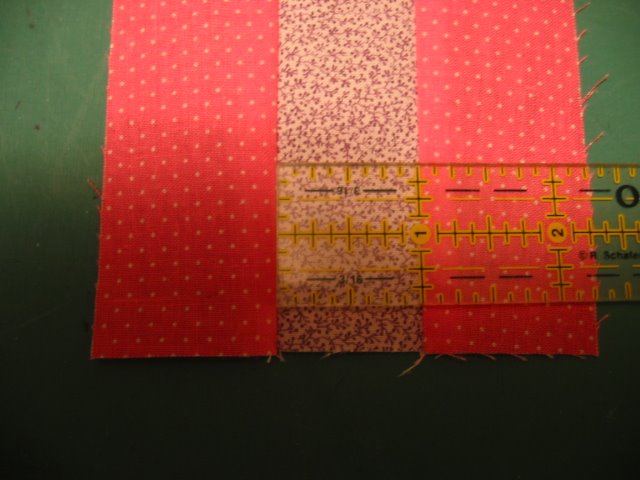
Cut 3 short 1 1/2" strips - I use about 4" lengths - two dark and one light. Using your "wall" as a guide, seam it together as shown in the picture. Press well to the dark strip. I use steam. Measure the finished size of the center strip with your ruler. It should measure exactly 1". If it's too narrow then your seam allowance is too fat, and you need to move your wall a smidgen to the left toward the needle. If the center strip is too fat, then your seam allowance is too narrow, and you need to move the "wall" a smidgen to the right away from your needle. Move the "wall", then do another test piece. Keep working at it until the center strip measures exactly 1". It might take a few tries, but once you have it you are set! As long as you train your eyes and your fingertips to keep the edge of your seam right next to the "wall" - and it doesn't take long at all to train them - your seam allowance will be the perfect width for your personal pressing and cutting methods, machine and thread.
If your machine has a top loading bobbin then your "wall" will go right over the bobbin opening. You can still make this work for you if you take an exacto knife and slice straight across the "wall" right where the door over the top of the bobbin opens. Sort of like a draw bridge opening. Your "wall" can split in half, with half staying with the machine and half lifting with the bobbin case. When you replace the bobbin cover the entire "wall" is back in position. (Thank you, Quilt Pixie, for reminding me that I forgot to address this issue.)
Notice in the picture of the wrong side that how the seam allowance is a scant 1/4" - it doesn't even touch the 1/4" mark on the ruler.
More to follow - opposing seams and a bit more about pressing.

8 comments:
yup, the wall works really well, must admit. The down side on my machine is the frequency you have to rebuild it in the right place as it sits across the bobbin cover plate, so every bobbin change it has to be remeasured and set up... :-(
I love the tip about using a build up of post-its as a guide. I have a bunch of long narrow post-its in my desk drawer. I am going to give them a try.
I'm enjoying this teaching. I have tried for years to get a perfect 1/4 inch. Now I know better thanks to you. Now to get Nelda my featherweight going.
I use a wedge of masking tape for my "wall" but I think I will purchase one of the magnetic seam markers for my new featherweight so I don't have to use tape.
Yep the measuring is the key! Thanks for writing all this up Patti!
When I took my first quilting class we were taught to use the mole skin. When I bought my new machine and had a quarter inch foot I figured I didn't need the mole skin. I guess I'm wrong. I'll have to put it back on and try my seams again.
Thanks for reminding me about the "wall".
Geez, I"m trying to catch up on everyone's blog and it looks like I"ll have to read thru this more! Linda already had a nice wall built for me when I bought mine with that moleskin or foot stuff. Lucky me!
Thanks for the tutorial!
Most of the time I'm happy with the ¼ inch foot that is on my machine... it's close enough to where I'm not losing many points for just regular quilting. But if I ever do one for a challenge, or that I plan to try to put in a show, then I'll use some of your tips for precision. :)
You are so right about the wall. It gets everything in place before it gets to the needle. I have struggled with the 1/4 inch business and with your assistance I might actually get it right. Thank you for taking the time to write this all out for us.
Post a Comment