
 Another great day yesterday - almost all my fabric is treated and put away. I have only 8-10 pieces left to do this morning. Then on to the next item - don't know what that'll be yet. I'll have to see what strikes my fancy.
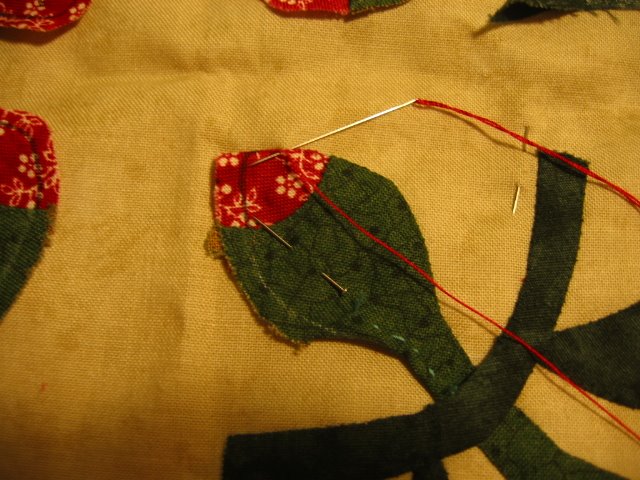
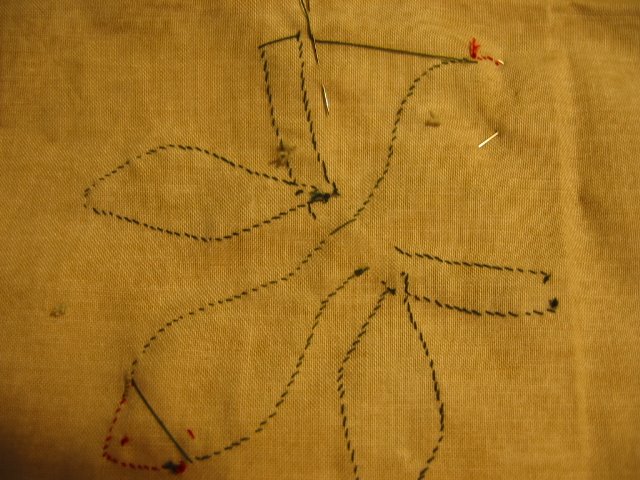
A few readers have asked questions about my appliqué. I wrote a bunch of hints for a couple people who asked. This morning it occurred to me that these would make a good post, as they might help others too. So here is my gift to you this Labor Day morning - lots of hints to make your needleturning easier. I've included a couple pictures. You should get the larger version of you click on them. Let me know if you want pictures of any other part of the process.
 Disclaimer - this is what works for me. If you do something differently and it works for you, that's great!
Start with an easy design with large pieces. Folk art designs are great for this, but so are many others. Choose one with gentle curves and no sharp points if you are new to appliqué. No really skinny stems either. Unless my stem is a long winding viney stem, I use a freezer paper template for it instead of a bias strip.
1. Trace the design onto freezer paper one piece at a time. (I use a pencil). Where pieces overlap - if there is no separate piece to trace - I use a dotted line along that edge. That tells me I need to allow some extra fabric there for tucking under a different piece.
2. Use good sharp paper scissors - I use older embroidery scissors - to cut out each freezer paper shape.
3. Choose fabrics for the various pieces of the design. Iron the freezer paper templates onto the right side of the fabrics. Space them far enough apart that you can cut a scant 1/4" seam around each piece. Trace around the freezer paper shapes with a fine point black Sharpie or a white chalk pencil or gel pen. If it's a dotted line don't trace across that part. This is in case there is some shift during the appliqué - and there always seems to be - you don't want that Sharpie line to show. I also don't trace across the bottom and top part of a stem - just in case I have to place a flower or leaf a little higher. Instead I mark tiny slashes in the seam allowance only to show where the stem should tuck under a flower or leaf. When there is a curve in the template shape put the curve on the bias as much as possible. Bias edges needle turn into a smooth curve much more easily than straight grain does.
4. Cut around each appliqué piece with sharp scissors, leaving a scant 1/4" seam all the way around. Where one piece tucks under another - noted by the dashed lines - I usually leave more than 1/4". For example, if it's a flower bud that is tucking into a u-shaped base I usually leave a good half inch beyond the dotted u-shaped line, and I don't mark that inner u-shape, because often the bud doesn't tuck down as far as you think it will and you want to have enough seam allowance left. Don't trim anything narrower than 1/4" - including points and sharp outer curves - you'll do that later as you stitch.
5. Remove the freezer paper.
6. Arrange your pieces on the background. If the pattern provides a layout I do this on a light box. If necessary I trace over the entire design with a black felt pen - wider tip this time - and put it on the lightbox, taping down the corners. Then I put my background on top of that and put my pieces into place. I use little dots of Roxanne's glue to hold them down. Try to keep the glue away from the edges. Where one piece tucks under another leave that part of the top piece free. You can pin it out of the way while you are appliquéing down the bottom piece. If you don't have a layout provided just eyeball the placement according to the picture. Most of the designs I do have no layout provided. I usually use a combination of tiny dots of Roxanne's and sequin pins to keep my pieces into place.
7. For stitching I use a #11 sharp - I prefer John James. Many people like to use the longer straw needles. I've tried them but don't care for them as much. Use whichever you like, but not a between. It is way too short to be a good tool for appliqué. Currently I use silk thread, but am switching to DMC machine embroidery thread as I use up the silk thread. The thread should match the piece you are stitching as closely as possible. If you don't have an exact match go a little darker rather than lighter. I tend to be lazy and use long pieces of thread, but it's better to stick to nothing longer than 18" to 20". Use a quilter's knot at the end. Always thread the end as it comes off the spool into your needle, and tie a knot in the end where you cut it off the spool. If you do it the other way around you will get lots more knots and twists in your thread because of the direction of the twist in the titself itsel f. I like to run my thread through Thread Heaven before I start stitching. It's a thread conditioner that also lessens knots and twisting.
8. When you start to stitch a piece, start on a fairly straight section of the piece if possible. Don't start at a corner or a point. Your start will be much more invisible this way. Before you start to stitch finger press the seam allowance under. You want to fold exactly next to the black Sharpie line so the black line is just turned to the wrong side of the piece. Turn under a very little at a time, pinching with your fingers as you turn before moving along. The edges don't stay turned under, but you are "giving the fabric a message" as to where you want it to turn under. This makes the needle turning much easier. If it's a large piece I finger press only part of it at a time.
9. Pick your starting place, and with the edge of your needle - NOT the point! - or your fingers turn the edge under a little way. Don't try to turn more than a scant inch at a time. Hold this turned under with the thumb nail on the hand that isn't holding the needle. The edge you are stitching is away from you - the piece you are stitching is between you and the edge you are working on. If your thumb nail is too short use the tip of your thumb, though that is a bit harder. Now, while you hold that edge under with your thumb nail, bring you needle up through the background and just barely grab the folded edge of the appliqué. Pull up the thread all the way. Now put your needle straight down through only the background right next to where it just came up into the appliqué edge. Your stitches should be exactly vertical to the edge of the appliqué like this - l l l l. They should not look like this on the right side - \ \ \ \ \ . The slant is on the wrong side. In one motion you will put that needle down through the background only, then slant the needle a little and come up through the folded edge of the appliqué about 1/16" to the left (or right if you are left handed) of the first stitch. You will be working from the right to the left around the appliqué piece if you are right handed, and left to right if you are left handed.
10. Here are the important things to keep in mind as you stitch in order for the stitches to be as invisible as possible: (1) match the thread to your appliqué piece, (2) your stitch from the back to the front through the appliqué piece should be as close to the fold as possible and still catch the piece, (3) the stitch back down through the background only must be straight up from the place you just came to the front - not at a slant.
11. The stitches can be a bit farther apart when you are stitching a straight stretch, but must be closer together around curves and points. I keep my stitches small enough that I usually get between 16 and 20 stitches per inch. Sounds like it would take forever but it doesn't - the more you practice the faster you get.
12. Stitch up to about a fat 1/8" of where you have the piece turned under and stop. Using the side of your needle push under another inch or so of seam allowance and once again secure it with your thumbnail. Little pointy places along the edge are caused by stitching right up to the spot where the turn under ends. Don't stitch that far before turning under the next section.
13. Inner curves should be clipped just up to the sharpie line as often as needed in order to get a smooth turn. Outer curves aren't clipped at all. In each case you will use the edge of your needle to smooth the seam allowance under the piece. When it's an inner curve one sweep of the needle side usually does it. If it is an outer curve you often have to "play" with it a little in order to distribute the fullness in the seam allowance evenly. I slowly sweep the needle edge back and forth, feeling with my left thumb as I do it. I can feel when it is flat on the underside, which is when I secure it with my nail and start stitching again. Don't stitch until you are satisfied with the way it looks. You never use the point of the needle to do any of the sweeping or turning because the needle point will cause the fabric to fray. Make sure you get the dark sharpie line turned under all the way around.
14. Tighter outside curves often mean trimming the seam allowance down to a fat 1/8" in order to lessen the bulk of the seam allowance. Trim a little at a time in front of where you are stitching so the piece doesn't fray before you get it stitched down.
15. When you are doing a point, finger press the seam allowance all the way to the point on one side. If it's a fairly sharp point you'll even see the seam allowance sticking out from under the piece. Stitch it all the way to the point before trimming anything. Secure the point by taking a second stitch on top of the first one. Now fold the appliqué piece back gently to expose the seam allowance and the seam you just stitched. After stitching you can trim this very close to the stitching - on the stitched side only. Now, use the side of the needle to sweep the seam allowance on the point itself down under what you just stitched. Don't worry if some of it still shows along the edge you've not stitched yet - it will unless it's a very fat point. Take a single stitch directly at the point. If you make it a little longer than the other stitches and the thread matches, the longer stitch will give the optical illusion of a very sharp point that is really thread, not fabric. Once this stitch is in place you can cut off the point of the seam allowance so it's short enough to sweep under the appliqué piece with the side of your needle. If the point is sharp you will need to push hard with that needle to squish all the seam allowance under the point. That's why your stitches here must be very tiny and close together. Once you've shoved it all under the point hold it with your thumb nail and stitch down the other side of the point.
16. A good tool for helping with stubborn spots is a toothpick with a fairly blunt point. The ones I use are pointed on only one end. They are hard to find. I keep the toothpick in my mouth so the point is moist. Use this to shove under stubborn areas, as the fabric clings to the moist wood. The blunt point won't fray the fabric like the point of your needle will. This is especially useful on sharp outer points like star tips and the tips of skinny leaves, as well as when a couple little fabric threads won't tuck under on an inner point.
17. For inner points, stitch down to less than 1" from the inner point. Now clip directly into the point just into the sharpie marking. Sweep the seam allowance under with the side of your needle and stitch down to that inner point. Take two stitches directly on top of each other at the point. Now sweep the next part of the seam allowance under with the side of the needle and keep stitching up the other side of the inner point.
18. To tie off, take your final stitch and leave the thread on the backside. Hide your knot behind the appliqué piece. Take a tiny stitch, then run you needle twice through the loop of thread formed by the stitch and pull the knot tight. Now slip your needle into just the background behind the piece and run the thread away from the knot for a good inch. Pull it out toward the back and clip.
I hope you find these tips useful.

19 comments:
Patti sent these to me when I was inspired to try hand applique. While I don't do needleturn - preferring to prep with freezer paper and spray starch I have to say that I've found these hints to be invaluable. I printed them, keep them in my handsewing basket and find myself referring to them on a very regular basis. I've gotten more out of these hints than I have any hand applique book I own (I own a bunch). The pictures posted are great, too. Patti, thank you for sharing your knowledge!
Wow! I wish I could take a lesson from you! One of my goals for this winter is to try needle turn applique - these directions/tips will certainly come in handy. Thanks!
love your tips. Sounds like your needle turning is done very similarily to mine, except I run a basting thread along the line I want to fold the applique on. I find it helps it "fold" in the right spot. Once its all appliqued I can then pull the basting thread out if it shows anywhere....
Patti your instructions are far better than most hand applique books that I've seen out there...thanks for sharing your knowledge with all of us.
Thanks for all your tipps. Help for my applique is coming.
Bea/Germany
Yeah right Patti! You make it sound so easy! You practically have a whole class here for us! Thanks!
Oh, Patti, thank you so much ! What a GREAT and CLEAR lesson !
I'm gonna have it printed right away, so that I can read it at ease.
Carol is right : you're better than many books !
Each time I visit your blog, I'm learning something...
Thanks again !
Your applique is beatiful and thank you for the lesson. Amazing!
thanks for sharing your tips. I have only done a little of needle turn applique but with your instructions i should be able to have another go without any problems.
Thank you for sharing your tips on applique. Until recently I was using starch with freezer paper, but have turned the corner to needle turn. So freeing to not spend hours at the iron starching everything down. I love that you don't insist on using straw needles. My big, ole paws just bend those dainty little things. I have been using betweens with success and have learned to ignore the *gasps* of the applique 'purists' out there. I once went to a workshop with Terri Thompson. She demonstrated a technique using a running stitch that was visible on the top of the applique piece. The room almost ran out of oxygen from the great intakes of air bu those who could not imagine letting their stitiches show. I just sat in the corner with my stubby little needle and smiled.
This is exactly how I needle turn and I'll say that the MOSt important part is putting that needle back into the background right at the same spot you came out from. People don't understand that if you go forward at an angle you are leaving almost 2 stiches worth unsewn on the side. You can look at the side and see what's not getting tacked down. Straight is better! That toothpick has saved me more times that not on very tight little inner curves of my leaves and flowers. It's invaluable for just tucking that almost no existant seam allowance under! You know those places where you have to divide what looks like an 1/8th inch between two spots! I dealing with that now on leaves!
Grea tips and so great that you wrote them all down for everyone to use!
On the washing post: It would be nice not to have to wash before I use! I wash when I begin a project as the smell has never bothered me I didn't notice there was one. I'm another ironer. I love to iron things so that never bothers me either. I wash in like colors on warm and always use a dye catcher now to catch the major dye. I know what's been washed and what hasn't by the edge. The washed ones are frayed a bit more and the un-washed have that new cut edge.
Thanks for your applique pointers. I use the freezer paper and starch method, but I still got some helpful hints from your blog.
Beth
Thank you so much for all those hints/tips. That was a lot of work to type it all out and I so much appreciate it. One of these days, I am going to learn to applique!
Judy L.
Lots of good tips and I should either print this off or bookmark it for future reference! Thanks, Patti for taking the time to write it all up.
Thanks for writing all these good instructions Patti. I will print them and keep them for references.
Wow, this post is timely. I will come in handy for special project #2 Nancy and I will be working on. Thanks for adding the information for us Lefties.
I love to applique, it's my favorite hand work. I can't do without those little pins and I use freezer paper and cut 1/8 around whatever it is I'm cutting. I don't remove the freezer paper until I'm done appliqueing. The only way to get better is to practice and do whatever works for you.Last time I appliqued I used silk thread which slides like butter through the fabric.
Thanks Patti - you are definitely on the same page as my patchwork teacher - she taught us the exact same techniques.
Many thanks for sharing :)
Thank you for the applique tips. I'm about to start an applique project and the instructions on my pattern weren't nearly as clear as these.
Post a Comment