
 I'm so glad Blogger and Bloglines are feeling better and playing together nicely today. I had a HUGE list of updated blogs this morning, and it included all the blogs where I found updates yesterday. So it looks like nothing was missed, it just took awhile for everything to show up.
Thanks to everyone for their nice comments on my tutorials. I really enjoyed teaching quilting, and I miss it. I've not taught classes now for over 13 years. Once I started working at the credit union my schedule changed, and the store where I taught - Daisy Kingdom in Portland, Oregon - stopped offering classes. I used to teach a lot for the guild, but I've let others take the spotlight the last 15 years or so. Hopefully I'll have at
 least one grandchild who wants to learn. In the meantime I'm enjoying sharing my knowledge with all of you who find it useful.
Sweet Pea asked a question that made me realize I left out another important detail when I wrote the seam allowance tutorial. She asked whether I carefully removed the "wall" when I needed to do other sewing. It certainly would get in the way for applying binding, doing paper piecing, etc. I'm lucky enough to have two machines, so I do nothing but piece on the featherweight. The "wall" stays in place all the time and I do everything else on my Pfaff that lives upstairs in the longarm room.
If you have only one machine here is the solution. When you are building the "wall" start with a strip of wide
 masking tape. If you are really careful when you stitch you can test the placement with only one strip by watching carefully. Get that one strip in exactly the right place, then build your "wall" on top of it. You can't see it on my machine, but I have one strip of masking tape under the red strip. That is never removed. When the sticky wears out on the "wall" and I need to build a new one, I have the location marked by that one strip of masking tape. Remove your "wall" as needed, but keep that one strip in place so you'll know where to put it back.
Eileen asked if I could post a link to my pressing tutorial. Happy to oblige, Eileen! Find pressing information here and here.
A few more hints . . .
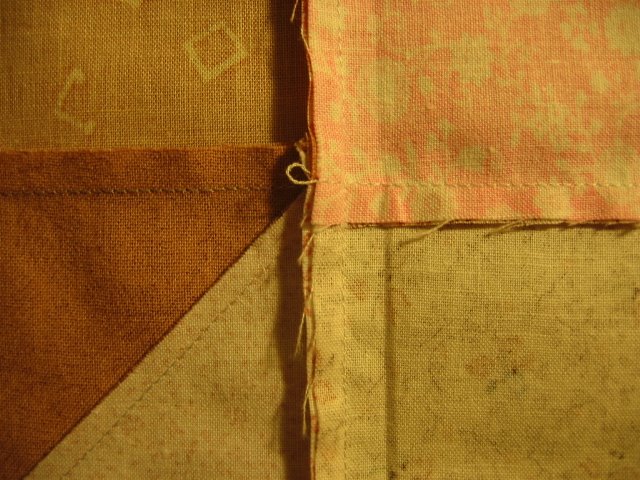
Everyone knows about opposing seams, right? When piecing a block make sure to press seams that will meet together in opposite directions. That way they can snuggle right down next to each other as they are being sewn together. If both are pressed the same way it's very difficult to get those points to match exactly. Sometimes p
 ressing opposing seams is in direct opposition to the rule of pressing to distribute bulk evenly. Don't worry about that - just clip the seam so you can press part of it one way and part of it the other way. When you are stitching along use your fingertips to feel the seams snuggled right up next to each other. If they are too close together your fingers will feel a spot that is too thick. If they aren't touching exactly your fingers will feel a tiny valley in between the seam allowance. As I said before, I piece as much by "feel" as I do by sight.
 Is everyone aware of what the feed dogs do? These are the jagged pieces of metal below your presser foot that move when the machine is running. They feed the fabric through the machine. Does everyone know that machines are designed so the feed dogs will pull the bottom layer of fabric through faster than the top layer? This is so you can ease a larger piece to a smaller piece - like one does when setting a sleeve into the armseye of a garment. If you are stitching two parts of a block - or two blocks - together and one is a little bit bigger than the other, put the one that is bigger on the bottom. Pin the beginning and end of the spot you are easing and stitch away. As long as the difference isn't too great the feed dogs will ease in
 the bottom piece and no one will be the wiser. An even feed foot, also called a walking foot, is designed so both layers of fabric are fed through the machine at the same speed. So if you have a walking foot on the machine you use for piecing use it all the time - unless you are trying to ease a larger piece to a smaller one. Disengage the walking foot while you are stitching those pieces.
 You've probably heard the "rule" about always pressing to the dark side. It's written in most every quilting instruction book that I've seen. Ignore it whenever necessary. Press to the dark side when possible, but first press to distribute bulk evenly and then press for opposing seams - both are more important than pressing to the dark side. Just take a quick look to make sure there is no edge of dark seam allowance showing on the right side of the block. If a dark line shows just trim it off a bit.
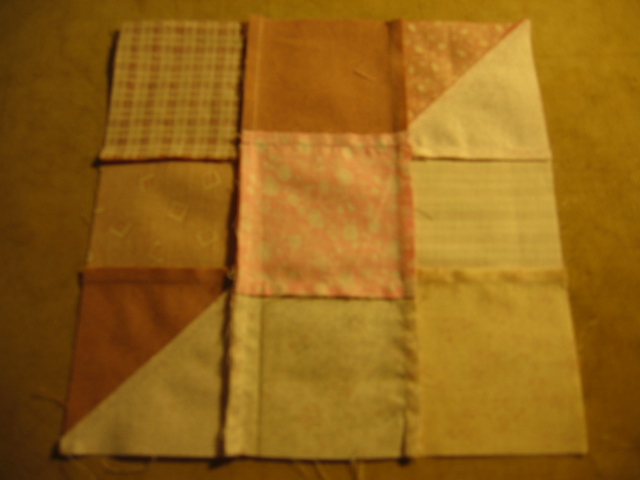
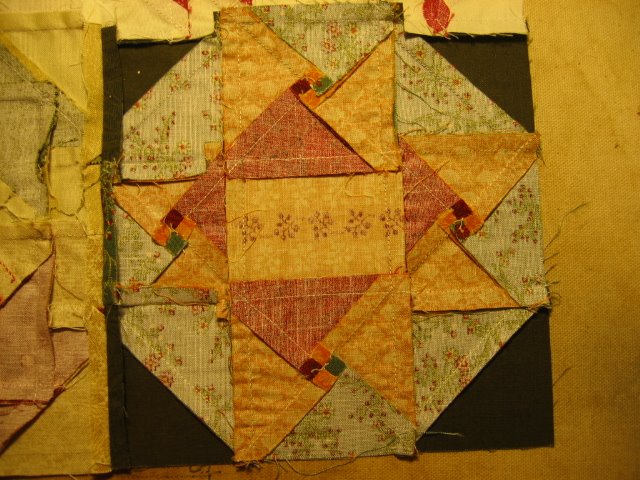
 I'm posting a few more pictures of the wrong side of pressed blocks in case some of you find this useful. All of them should enlarge if you click on them.
And now into the sewing room to stitch. I have so many things I want to do I'm having a terrible time deciding which project I should work on today. I might even start a new one - either the Warm Hearts quilt with the beautiful Mistletoe Manor fabrics or the center for my medallion - since we are over halfway done with the class I really need to get started, don't you think?
Have a wonderful quilty day everyone!
************
Gratitudes:
1. Rain, blessed rain!
2. Quilt shows
3. Weekends
4. Hand dyed wool
5. Strong, hot tea with milk - my morning drink of choice
*************

8 comments:
Hi
You dont need to build up with masking tape you can buy moleskin at the pharmacy, it is adhesive on one side and about 1/8 inch thick and works really well.
Pat
Thanks for this Patti, I will use the tip about 'snipping' the seam allowance where needed. Now I know that it's 'allowed' I won't feel too bad. Thanks for all the shots of the back of your work - it's really helpful.
As normal, good advice, all of it!!
thanks for the idea of marking the line fairly permanently using masking tape that doesn't get moved... mush better than continuing to set up the machine every so often :-)
Patti - thanks again. Walking foot will go on my machine next time I piece!
Good idea about the one strip of masking tape staying there all the time.
But the really important tip is how to get those opposing seams sorted out. I found I really had a hard time thinking it all through for friendship star blocks - I pressed opposing seams for each row, but when I came to stitch the three rows together some of my point seams were pressed the 'wrong' way and I had terrible bulk - which is really hard to hand quilt LOL!!
All really good tips. I have a machine with a 1/4" foot, but find I am more accutate without it. I'm going to use the "wall" on my next project. I know I probably have sloppy pressing techniques. Off to read the tutorial on that *s*
Once again, thank you Patti for the great tutorial. You have a natural gift for teaching.
I do have a question about clipping-how many threads out from the stitched line do you snip to? Does that make sense?
Great information. I appreciate your taking the time to provide that tutorial for us. It is just the thing to share with my daughter who is a beginner to quilting.
Thanks
Post a Comment