Showing posts with label Pre-1830's Medallion Quilt. Show all posts

Monday, April 21, 2008

A finished top

I'm happy to report that the medallion quilt is now a finished flimsy - 101" square. It took me at least a day longer than I'd hoped - but it's done. I've put the remaining pre-1830's fabrics into the cabinet so I have two empty baskets for the next class. The last border consists of period correct chintz. We received it in our packet at the last class - we had about 10 to choose from and I felt this one enhanced the colors and fabrics of my quilt the best. The first pictures shows the final border of stars before they were sewn together and attached. You may also notice that I decided to move that outside gold pointed star to the other side of the quilt to spread out the gold even further, and I'm glad I did. There isn't any floor in this house big enough to spread this out for a full picture, so I settled for a picture of a quarter of the quilt so I could show the border. I really love how this turned out!
I thought I could get back to Civil War blocks next but I'm afraid they will have to wait. My featherweight has started making bad noises and breaking thread- I really babied it along through these last two borders. I took it apart for oiling and cleaning but that didn't do the trick. So she is going to have to go to the doctor as soon as I have a chance to take her. It will be like leaving one of my children - I hate to have her out of the house and not with me!

Sunday, April 20, 2008

Much better!

I moved around a few of the hourglass blocks and it made all the difference. I think this looks so much better, and I don't think I need to move anything else. I'm really glad I took the time to do this. I know I would have been bothered by the other every time I looked at the quilt. Doing so wasn't all that bad, actually. Though it would have been much easier if I'd done it when things first started to bother me - about three borders ago.

All my fabrics for this quilt were in a terrible jumble on my cutting table since I cut out nearly 30 stars without refolding anything. So I took the time to straighten up, refold, and set aside lights that I've not yet used for star backgrounds. Now I'm all set for making the last nine stars - after I fix something for us to eat. It's going to be easy so I can get back to sewing - hot dogs and canned soup. I'm blessed to have a husband who doesn't mind such things for dinner!

Three-quarters there

Today I couldn't resist sewing stars on three sides of the medallion. I have two more star blocks made, but one of them is just not acceptable color wise. It's been relegated to the orphan drawer. That means I have nine more stars to make before I can finish this round. After this round is the final chintz border. This is a BIG quilt. With the star border it measures 85" square. The final chintz border is to be another 8" wide - thus the finished flimsy will measure 101" square. This is fitting to the era also - beds were tall in the late 1700's and early 1800's. Many bedrooms were equipped with a small step stool to help one climb into their bed. Many early medallion quilts were much larger than this - 120" square or more.

Seems like the more I try to spread that bright gold fabric around the quilt the more I find myself sticking it again and again in the same place. I'm going to need to take out that one gold star and put it into the border still to be constructed. That still leaves a bunch of gold in one spot near the center, but I don't think I want to start ripping out that far into the quilt. Every time I look at it I find it bothering me, however, so I just might have to do that.

In the back of my mind I'm trying to figure out how to quilt this monster. Since sewing machines weren't invented in this era the only authentic way to finish it is by hand. I don't think I'm prepared to do that however. Most quilts of this era were also quilted in straight lines or a diagonal grid. Both of those would be very difficult to do with a longarm. I believe clam shell quilting was done in this era, but I don't have a clam shell template for my longarm. Baptist fans were not yet done on quilts - they weren't done until the Civil War or later. So until I can solve the question of quilting this it will go into the closet with my other finished flimsies.

Friday, April 18, 2008

Stars

I spent Wednesday making stars, and then made a few more yesterday after babysitting Joseph. I'm cutting them out a few at a time and then sewing them - easier on my back than standing to cut them out all at once. Besides, I don't have enough table space for that many stars. I've just slapped them up on the design board - they aren't sewn together and aren't in their final arrangement either. I'm going to make a few extra so I can pick and choose. I'm not sure I like the star with the bright lime green star points- even though Eileen OK'd all of my fabrics the green stands out more than anything else in the entire quilt. So that block may be added to the orphan drawer. These stars are fun to make and go very quickly. I'm really motivated to finish this flimsy because I'm not going to allow myself to do any more Civil War Diary or Dear Jane blocks until I finish this monster!

************
Gratitudes:

1. Spring blooms everywhere! Newest are the azaleas, crabapple, cherry and apple trees.
2. Time spent with Joseph
3. A planned trip to see Jeremy, Chelsea and Sophie tomorrow
4. New fun flavors of coffee creamer
5. Starbucks' almond twists

Wednesday, April 16, 2008

Moving on to the next round - finally!

Thanks for the suggestions everyone - I really appreciated them! I finally went with the first - and easiest choice - the dark brown. It was the easiest because I had plenty of yardage. Using anything else would have meant either lots of piecing or more shopping and I really didn't want to do either of those things. When all is said and done I'm sure I'll like this choice just fine.

So . . . today I finished the corners of of the checkerboard and mountain border and sewed on the stopper border. Since this border wasn't one of Eileen's choices I'm now moving into uncharted territory. At least the math changes on the next border were easy! I moved my big board long enough to hang the whole thing on the design wall in the sewing room so I can see it every day - and thus - hopefully - be motivated to make the necessary 36 stars quickly for this last pieced border. As you can see two are finished, and I'm cutting out a bunch more. They sew up really quickly thank goodness. I work on two at a time, using each as the leader-ender for the other. My goal is to have this border finished by the middle of next weekend. Then all that will be left is an 8 1/2" wide plain chintz border. Hopefully I can have another finished flimsy by the end of next weekend!

Monday, April 14, 2008

More decisions

Thanks to everyone who gave me input on my medallion. I'm still trying to come to a decision. I've decided I do need the "stopper" border in between the stars and the mountains - but what fabric should I use? I tried a few more and eliminated some of them easily. Here is my thinking process.

First I repositioned the stars so only 2" of the brown fabric shows. That gave me a better idea of what it would look like sewn together.


Next I tried a slightly lighter brown fabric. OK, but really no better than the other.


I tried a considerably lighter fabric - one with a neat curving feather stripe. Oh no - I don't like this at all!


Finally I tried the blue stripe. I didn't try it sooner because I have less than half a yard - not nearly enough. My friend Kathie found a place I can get more online so I cut strips to see how it would look. Hmmm . . . I like it, but I'm not sure I like it better than the brown.

I could try the blue stripe with brown corners like the border in the center - but first I would have to hunt for that brown floral. It has escaped from my baskets and found it's way back to my shelves - somewhere. Not sure I want to spend time right now hunting for it.

So this is the burning question . . . do you like the blue stripe enough better than the brown one that I should go to the trouble of ordering two yards - so I don't have to piece it - online and waiting for it to come? I'm not at all sure I like it that much better.

Sunday, April 13, 2008

Decisions, decisions

I spent most of the weekend working on the medallion. The checkerboard and mountains border was finished easily by lunchtime on Saturday. Then I spent the rest of Saturday and part of today trying to decide on cornerstones.

I didn't like the look of a large plain square at all.


I thought I'd like a diagonally placed four patch, but didn't like the way that looked either.


I tried a square in a square block next but that wasn't right.


Next came a double four patch. That was better - I liked the way it "finished" the checkerboard border. But I didn't like how it led my eye off into the corner.

What if I replaced the one four patch with a triangle square? Nope - don't like that.


How about one four patch and three plain squares? I think this is the best so far. It might work.

My final try was to cut more triangles and finish the outside mountains so they looked like the rest of the mountains. I had considered this idea a couple times earlier but discarded the thought without trying it. I didn't think I'd like that much light fabric in each corner. Wouldn't you know it - I like this one the best. Once I had it in place I realized it perfectly echoed the first border around the center.

Finally! I made the decision by mid afternoon today. Now on to border number six.

I decided on variable stars for the sixth border. I made five of them and set them into place on the design wall to see how I like them.

Hmmm . . . I like the stars . . . but now are there too many light fabrics next to each other where border five and border six meet? Maybe. So I tried adding a "Plain Jane" border like the one I added after round two. Hmmm . . . I'm not sure if this is an improvement. Maybe this fabric is too dark for this narrow border. Maybe I should try a medium tone for the Plain Jane? I haven't had time to cut that one yet to try out, so I don't know how that would look. I'll have to try that tomorrow. If I go for the Plain Jane I have five stars I can't use as the stars will need to be 8 1/2" finished instead of 8" finished.

Decisions, decisions . . . sometimes it's so hard. So I'm going to sleep on it and look at it again in the morning. I invite your ideas also if you would like to join in my decision making.

In the meantime I made another Dear Jane block - C-3 - Rayelle's Fence - so I could stay caught up with the group. This one was really easy. I just sewed two small strata, cut them into strips and sewed the strips together.

Friday, April 11, 2008

Update on the medallion

I was perusing the giant 3-ring binder of lessons for the medallion quilt and discovered that there is another 8" border between the border I'm doing now and the final chintz border. Looks like I won't be done with this top tomorrow after all. That's OK - I think the 8" variable stars that I felt weren't appropriate for this border will be fine for the next one. The 4" centers will allow me to feature a bunch more of the beautiful prints in the baskets. And I love to make variable stars. Since I need to do another border it's a good thing it's one I'll really enjoy doing!

Checkerboards and Mountains

That's what Eileen calls the border that I chose for the next round of my medallion. I thought the checkerboards nicely echoed the squares surrounding the center, and the mountains were paired with the checkerboards in her instructions. I like them and probably would have chosen them even if they hadn't been included because the triangle shapes echo those in the flying geese border. I have sewn all the checkerboards together but the mountains are just placed onto the design wall. I will sew them tomorrow - right now I'm heading upstairs to watch the Mariners beat - I say that very hopefully - the Angels. My Mariners haven't done very well so far this year - hopefully they can start doing better now that they are back home.


It was really fun to work with all these fabrics again today. They are so different from what most of us think of as 1800's fabrics. So much brighter, more colorful and exuberant than the fabrics from the 1840's on. I never would have identified most of these as reproductions, but have Eileen's expert assurance that everything I've placed in my pre-1830's basket is representative of that era. I used this as a great excuse for shopping - especially loading up on any fabric with "Sturbridge Village" in the title as Eileen told us that entire line was authentic reproductions. So of course I have enough fabric in the basket for at least three or four more pre-1830's quilts!

After the mountains are sewn together and sewn to the checkerboards I will have only a couple more steps left. Cornerstone blocks for this round must be chosen and constructed. Then the outer chintz border strips sewn on. Doesn't sound like all that much - maybe I can finish tomorrow. Sunday for sure!

Back to working on UFO's

I had a marvelous time with Joseph yesterday - and came home tired with lots of aching muscles. It's been over 30 years since I spent all day keeping up with a little one! Crawling around on the floor with him was great fun - he is such a happy, contented little guy - but sure didn't do my sore knees and shoulder any good LOL! I loaded up with Tylenol PM last night and slept a good 9+ hours. It's a good thing I'm doing this only twice a week. Should help me get into shape. He is in the process of adjusting to his parents going back to work, and nap times seem to be suffering the most. His morning nap was all of 15 minutes instead of the usual 1-2 hours, and was taken under great protest. His afternoon nap didn't start until 2:30, and was also protested violently. So he was still sound asleep when his daddy got back home at 3:30 all ready to play. Hopefully by the time I'm there next Tuesday that will be all worked out.
Today I've designated as pre-1830's medallion day. This was the first class I took with Eileen Trestain. I kept up well for the first several classes and then life intruded. I've done nothing on the project since October 2006. There are only a couple borders left, and the last one is just fabric strips, so I hope to have a finished top in the next few days. As it's now too big for the design wall in my sewing room - the bottom of which is blocked by my ironing board - I'm finally having a chance to test the gift I received from my hubby last Christmas. This is Cheryl Ann's portable design wall - what a great invention! I had to set it up in the living room in order to have space to step back to look at my progress, and the living room is at the opposite end of the house from my sewing room. Oh well, I can really use the exercise LOL!

************
Gratitudes:
1. Sunshine and warmth today
2. Grape hyacinths blooming all over the yard
3. Red and yellow tulips opening to the warmth of the sun
4. The smell of freshly brewed coffee
5. Happy grandchildren

Friday, March 30, 2007

Fickle quilter . . . .

Thy name is Patti! Here I've been piecing up a storm from my scraps and accomplishing much in the way of charity quilting. But all it takes is one little detour and before I know it I'm wandering down an entirely different path. I blame it on the one appliqué block I had to finish for Posies and Points, and the great feeling of moving a project from the UFT list to the flimsies list.

So what am I doing now? Well, I'm back to appliqué and Heirloom Stitches. I've not touched this project since last year. When I put it away I still had appliqué to complete on two November blocks and all of December's blocks to make, plus the border. I'm now working on the last November block - the worktable looks a little different when I'm doing appliqué than when I'm piecing, doesn't it? Fred spend the evening upstairs watching hockey so I put the last two episodes of the second season of MI5 in the DVD player in the sewing room and sat appliquéing using the good light on my featherweight table. I've pulled all the completed blocks out of the closet and hung them in plain sight on the door where they can motivate me to finish. I'm hoping to get the rest of the pieced blocks done this weekend as well as finishing this block, and maybe do the prep on the last of the appliqué blocks.

I also dug out my pre-1830's medallion to see if it would start talking to me. I was at a loss last fall as far as the next border - it just wasn't telling me what it needed. So I pinned it up on my design wall and looked through the choices for the next border in "Lesson 9". Wouldn't you know it - it started talking to me immediately and told me just what it needs. And I'm happy to report it's something quite simple that shouldn't take much time at all. That's a good thing - I want to finish this top also because I've already started on my first block for the mid-century album quilt.

In the meantime the fabrics for Joseph's quilt have been set aside. I'll get back to that very soon - it's just not what is calling to me this weekend.

Friday, January 26, 2007

A little bit of everything

Let's see. It's hard to know where to start first! I guess I'll start with our son and daughter-in-law Jeremy and Chelsea. Chelsea is wearing black so it's hard to see "Sophie" in the picture but she is definitely there. They liked the quilt very much, and have promised to actually use it. Chelsea saw the doctor yesterday and he was surprised to find that little Sophie just might arrive sooner than expected. We told them we want a call as soon as they get to the hospital - even if it's in the middle of the night. I can't imagine new grandparents that are more excited than we are!

Last night was our last class for the early 19th century medallion series. Those of you who've been reading my blog for awhile will remember me talking about this class when we first started. Our instructor is Eileen Trestain, a certified quilt historian and appraiser and expert in fabric history. She's written two books on fabric dating, and we are so lucky she lives here in town. I've posted a picture of my medallion, which hasn't progressed any farther as I had to stop to make Sophie's quilt. It still needs three borders. At the last class instead of receiving the brown paper wrapped kit we got to choose 3 yards of a selection of chintz and large reproduction florals. In the picture above you see Eileen on the left cutting my selection and one of the other students on the right. The next picture is my friend Liz looking at her choice for her border.

Tomorrow is scrap cutting day with my blogger friend Cher. This is the second time we will have gotten together to cut scraps. Hope it's as productive as the first time. Here you see the task I have ahead of me. I weighed these two boxes and found I have about 36 pounds of fabric here. If I remember correctly 4 yards of cotton fabric weigh a pound. Please correct me if I'm wrong - at the moment I can't find any of the places I think I read that! If that is true then these two boxes contain about 136 yards of scraps - that's after I took off a couple pounds for the boxes. It's almost as much as Jeanne has in her two garbage bags! Jeanne says she is scaring herself - I'm right there along with you Jeanne! There should be at least 10-15 scrap quilts lurking in these two boxes! I seriously doubt that I have enough room in all my plastic drawers and boxes of strips, squares, triangles and bricks for everything here. I need to get sewing - quickly!

************
Gratitudes:
1. A sewing weekend has begun
2. Crisp blue skies after the fog cleared
3. Quality sewing time with friends
4. Oodles of scraps for quilty play
5. Chocolate covered pretzels

************

Sunday, April 2, 2006

One finished project - and progress on another

Well, I discovered 5 UFO's that weren't on my list. These weren't UFO's I'd forgotten - just UFO's that I thought I'd already listed. I discovered the omission when I opened the spreadsheet for updating. So I am now the happy owner of 51 UFO's, instead of the 46 I thought I had. And all 5 of these have not reached the finished top stage, so added them to the sidebar on my blog.

I spent this week working on one of these - a Civil War sampler that began as a $5 quilt top. You probably know how that works - pay $5 for the first kit of fabric and pattern, then as long as you bring back the finished block each month you get the next month's kit for free. I had one last block that needed doing. I'd kept up nicely - but then the shop closed on Memorial day almost 2 years ago. We got our last block kit, but no sashing or border patterns or fabric. The instructor arranged for us to meet elsewhere, but charged $5 a month for the pattern and furnished no fabric. I was able to get the sashing patterns but not the border patterns. I finished the last block on Sunday night, and put them up on the wall.

Keeping in mind what Sharon Craig talks about in "Setting Solutions" and "Great Sets" - I highly recommend these books - I picked a pieced sashing and added a bunch of new colors. I chose from Civil War reproduction fabrics I've collected, but kept to brighter and more colorful choices. I finished setting the blocks together today. I wish I could remember what the borders on her two samples looked like. I know they were pieced, but that's all I remember. So I've hung this up on my design wall, hoping it will tell me what I need to do for borders. I want more than just strips of fabric.On March 23rd, I attended my second Pre-1830's medallion class. I received my second "packet", which included the rest of the fabrics for my center, my second handout, a vintage postcard, and a letter from my "dear sister". If you remember, the first month I had a letter from my "loving husband" along with some chintz and muslin he'd sent me for "the quilt I spoke of making for our bed". This time the included fabric was sent by my "sister" - scraps from making clothing for various family members. She was one of the people my husband visited on his trip, and he told her I was making a quilt for our bed. Here is a picture of my first two sets of fabrics.

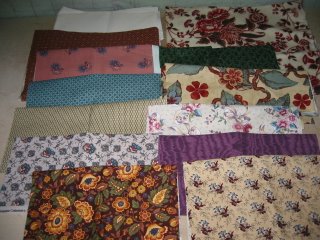
Now I must decide what my center medallion will look like. I can do an elaborate broiderie perse Tree of Life with the chintzes, which would be typical of a quilt from the early 19th century. English ladies took expensive chintz imported from India, cut out whole motifs from the cloth, and arranged them in a new design using English fabric for the background. They appliqued them down with either a blind stitch or an extremely tiny buttonhole stitch. This way they stretched a single yard of chintz to it made an entire quilt. I'm tempted to do this, but would need to find a couple other fabrics, as none of my chintzes have birds and I'd want a bird in my tree. Other choices for the center include a simple variable star, a simple pinwheel, an appliquéd dahlia that looks somewhat like a multilayered Dresden plate block, or an appliqued laurel wreath. I can also choose any pieced block that would have been used in this time period. What a difficult choice! I need to examine my fabrics well, and decide which would suit them best. We have no class next month as our instructor is teaching in Paducah, Kentucky at the quilt show, so I have two months to finish my center.

We learned about "make do's" during the class this month. Since china, glassware and other items were scarce and expensive in the 19th century, they weren't thrown away when chipped or slightly broken. Instead they were turned into something else useful. Many lovers of primitive and folk art are now making and/or collecting these "make do's". Eileen (our instructor) talked about turning candlesticks into pincusions, attaching rope to handleless teapots so they could still be used, etc. We spent the rest of class creating "make do's" from either wool or silk scraps. The wool pieces became large strawberrry pincusions or simple flattened squarish pillow shaped pin cushions. The silk scraps were made into balls using a pattern from Ginny Beyer's book "Puzzle Balls". We all used short candlesticks for bases. This was lots of fun - I'm eager to make one from wool also.
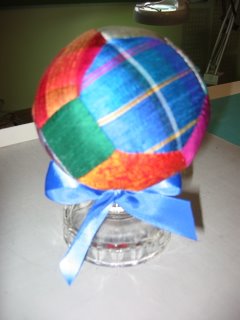
Here is a picture of mine, which I finished yesterday. I didn't want to stuff it with polyester fiberfill as that dulls pins. Instead I used a bunch of my daughter's curly brown hair that I've been saving for years - she has incredible hair. When she was a little girl I did it up in French braids or two pony tails. When she wanted it cut short in junior high school I saved what was cut off. I'd forgotten all about it until I cleaned out a bunch of sewing room drawers this last week. As soon as I saw the sack I knew what it was, and knew exactly why I'd been saving it. The lanolin in her hair will keep my pins sharp for years. I added a package of rabbit fur I bought for some long-forgotten project, then finished with polyfil around the base. I've put a bunch of pins in it and set it on the window sill about my featherweight. It looks so bright and colorful there!
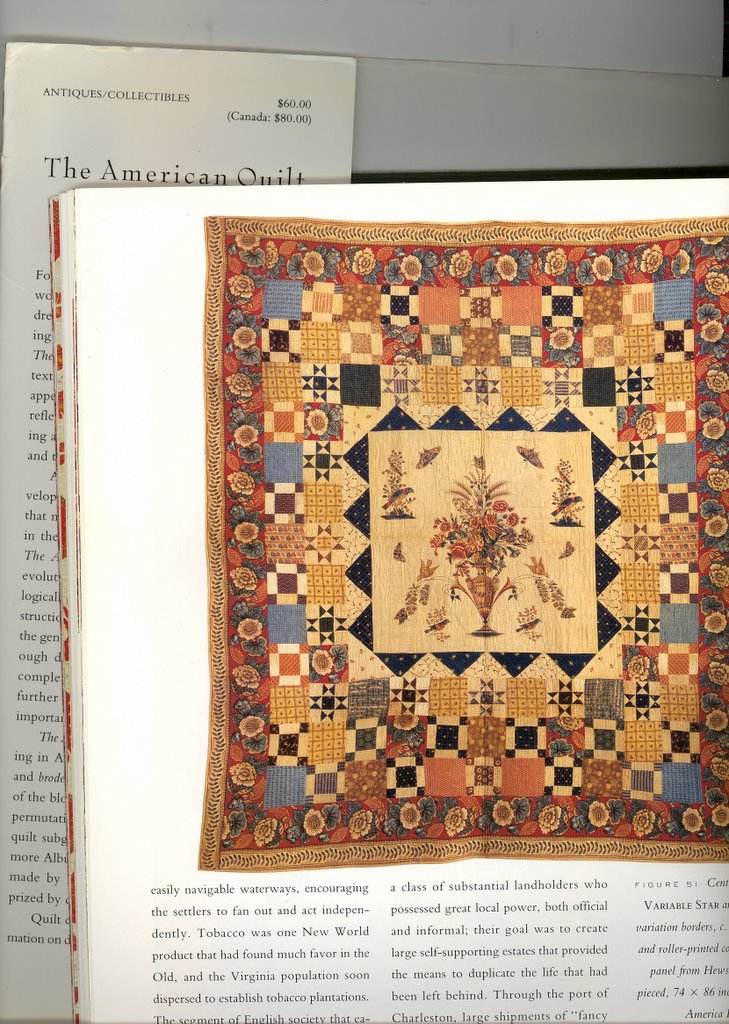
Friday, February 24, 2006

What an incredible experience!

In a couple of earlier posts I've alluded to a class I signed up to take. It's because of this class that I had to iron the fabrics my dear husband gave me for Christmas, including the Jane Austen fabrics made in England. The first class was last night, so it's time to tell you all about it.

My instructor is Eileen Jahnke Trestain. Eileen is an internationally known textile expert and AQS certified quilt appraiser. She is the author of two books on dating fabrics. We are lucky enough to have her living in our town, where she serves as the textile expert for the Fort Vancouver National Historic Site. Currently she is directing the construction of new costumes for the dozens of volunteers at the park so they will be much more period correct as to colors and fabrics than they've been in the past. The class I'm taking is called "The Early American Medallion - Pre-1830 Reproduction. We will be meeting once a month for a year, and during this time we will each create a pre-1830 medallion quilt top for ourselves. Three of my friends in the North Star Quilt Guild took the class last year, and their quilt tops are spectacular.

Last night we became "close up and personal" with at least 6-8 quilts and quilt tops from this time period, as well as many authentic antique fabrics from Eileen's collection. I got to hold and examine a French toile de jouy made in the late 1700's. We got to examine "mosaic piecing" - blocks with a center hexagon and two rings of hexagons around the center that were pieced about 1810. These were constructed using English paper piecing, and the paper was still basted to the blocks. The most interesting thing about these blocks was the paper - it was made from linen. Making paper from wood pulp was invented later in the 1800's. Because it was linen the paper was as soft and flexible as the cloth. It was non-acidic so there was no deterioration of the fabrics. The stitches were so tiny it was truly unbelievable. I thought my stitches were tiny - anyone who looks at my applique comments on how very tiny my stitches are - but they would look huge compared to these stitches. I didn't have a ruler with me so I couldn't measure, but I estimate there were at least 30+ stitches to the inch. Their needles must have been really tiny! Another amazing thing about these fabrics is how bright and colorful they were! We tend to think of antique quilts as dull. These were anything but dull! Yes, the purple had faded to brown, and some pinks had faded to brown, and everywhere black dye occurred the fabric was disintegrating because the dye was caustic, but the reds, golds, yellows, and blues were very bright. We were so in awe of what we were seeing! Examining the construction techniques, the fabrics, the threads, the designs - what an incredible learning experience! We learned about various dying and printing techniques from the period - first block printing, then roller printing - about plant dyes like indigo and madder, about cochineal dye made from tiny mites, how fabrics were staked out in the sun to bleach for months, how designs were created using mordants and so much more. I had read about all this in her book before going to class, but hearing it again while actually examining the fabrics and quilts was an incredible experience.

At the end of the 3-hour class we each got our first "kit". These were wrapped in brown paper and tied with cotton string - much like packages might have been wrapped in that era - so no one could tell what they were getting as the kits were passed out. Every "kit" was different with different fabric. Each contained a letter from the person who is "sending" us the fabric. Mine is a four page letter from a husband to his wife, written in a flowing script. It was enclosed in a cream colored envelope sealed with red sealing wax that was stamped with a quill design. It begins "To My Beloved Wife". My "husband" has gone north to Boston to see some land near where my sister and her husband live. He relates the family news and talks about how much he likes the land and how much he hopes the owner will sell. He is unsure, however, because the owner has been "most unreliable" ever since his only son died at Valley Forge. He closes by telling me of his visit to the mercantile owned by a family friend, a Mr. Hobbs. There he saw some beautiful chintz which Mr. Hobbs sold him at a discount, though the cost was still "dear". He thought I could use it in the quilt I talked about making for our own bed. So he has sent the chintz along with the letter and another piece of fabric that I can use with the chintz.

Here is a picture of the contents of my "kit". Also included is a 9-page syllabus to get us started on our way. Next month our "kit" will include more reproduction fabrics - including more chintz - created from designs of that era. The two kits together will be used to make our center. We will receive several possible center designs - both pieced and appliqued, as well as a few templates to use if we decide to create a "tree of life" broiderie perse center. Between now and then I'm going to pour over the pictures in my quilt history and quilt search books to get ideas for my center. I'd like to piece and appliqué the entire quilt by hand, as the sewing machine - as we know it - wasn't invented until after 1840.

Here is an example of the style quilt we will be making. Ours will be 89" square without a final chintz border. If we decide to add a final border it will add about 14-16" in both width and length to the quilt. This picture is from "The American Quilt" by Roderick Kiracofe - a fabulous quilt history book that was hard to find for a long time but has recently been reprinted. This quilt, on page 54, is a circa 1800 quilt made with wood block and roller printed cottons. The center panel is from Hewson Printworks. The quilt is in the collection of America Hurrah.

I can hardly wait to get started!