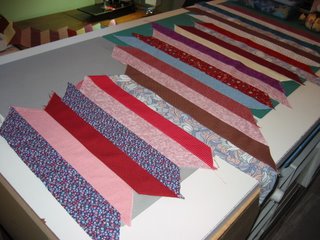
 Finn, I can see the great big smile on your face as you read this. I have become totally obsessed with using my scraps! At this point I have no idea whether I have enough Broken Dishes blocks to finish my quilt, but that really doesn't matter. I continue to make half-square triangle squares. Another of my plastic boxes was full of bias strips 2 1/2" wide. In the past I always made my half square triangle squares from bias strips, using the method developed by Marcia McCloskey and Nancy Martin. It makes totally accurate squares that go together so beautifully. So the last couple days I've sewed the strips together and last night I started cutting squares. I thought I'd share this method with you because many of you may not be familiar with it. I love this method, and still use it
  when I need a lot of bias squares from the same few fabrics.
First I lay all the strips out on my cutting table the way I want to sew them together. Usually this is a light-dark-light arrangement. Even though the strips may be different lengths, keep one edge even - like the top of a picket fence. (In my first picture there is one big jog because the ends of the strips weren't angled the correct way. This just makes the cutting trickier.) I first sew them into pairs, then into sets of four, and so on. I make my sets as long as my cutting table, because the longer the set the more squares, as the two edge strips have left over triangles instead of squares.
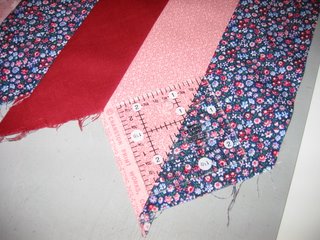
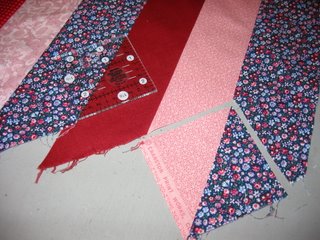
 The most important thing when stitching the strips together is to make sure you aren't stretching the bias edges. Press to the dark as you stitch things together, unless you are cutting squares 1 1/2" or less. When they are that small I like to press the seams open. Once they are all together get our your square ruler and rotary cutter. Align the 45 degree angle line with the seamline and make the first two cuts, which will separate the square from the strip set. Working across the bottom of the "pickets", cut a square from each point. This gives you a new set of points, which you then cut into squares working in the opposite direction. When you have cut all squares you can, then go back and trim the other two sides of each square for a perfect half-square triangle
  square. You can get a special ruler designed just for cutting these squares, but it isn't necessary.
You will have some pieces left at each long edge that are sort of triangle shaped. Stitch these together on the bias edge and you will be able to cut a few more squares.
The rule of thumb is to cut your strips the same width as your unfinished square - 2 1/2" strips for unfinished 2 1/2" half-square triangle squares. I've found, however, that when the squares are little it's best to cut the strips about 1/8" wider and when they are bigger you can cut the strips 1/8" narrower. Once you are cutting bias squares larger than 4 1/2" square this method is no longer efficient. At that time I just cut squares, pair them up right sides together, and cut them in half diagonally. Then I stitch the cut edges together to form the bias square.
When I need just a few bias squares from each fabric combination I cut large squares from the fabrics rather than bias strips - 6", 7", 8", 9" or 10" squares, depending on the number of bias squares that I need. Then I cut each square across the diagonal, and cut each half-square into appropriate width strips. The last two cuts give you two triangles that you can stitch together for a final square.
There is a small amount of waste with this method, but because of the total accuracy of the method it's a fair trade. I used to save the small waste pieces for paper piecing, but not any more. And I find they don't work for crumb squares because they are sort of diamond shaped instead of square.
So that's what I've been doing these last few days instead of posting. This weekend I must finish the wedding quilt for my friend, and I hope to also finish piecing the Broken Dishes.
Then I think I'll make some Mile-A-Minute blocks from the plastic boxes of crumbs and odd-sized bias squares that I've found!
I LOVE what your doing with your scraps! I have got to get going and cut up some of my old stash and do some of this! It would make me feel so much better to clean some of it out I think!
ReplyDeleteYour obsession with your scraps is like my new obsession with applique. LOL I'll bet you're having fun!
ReplyDeleteI love scrap quilting, just wish I could get all my bits organized into a system. I will have to try this way of doing HSTs!
ReplyDeleteGood tutorial. Not my fav way of doing HSTs but it works well for you---obviously! Good that there are so many ways to approach this, I feel.
ReplyDeleteGo, Patti, go. Stitch, Patti, stitch.
Great lesson , you demonstrate well. I'm going to give this a shot this weekend.
ReplyDeleteThanks
Melanie
How clever! I have seen this in books, but never in real life. Make me want to try it. Thanks for sharing :-)
ReplyDeleteI love scrap quilting, too, but it's hard to get the process organized mentally; quilting is quite the mental challenge (and a challenge in so many ways, like finding enough time to devote to it).
ReplyDeleteThis method looks very interesting. It might just be the
ReplyDelete"push" that I need to work on my broken dishes.
Ahhhh Patti, *VBS*, you are getting to know me well...*wicked grin*. I adore your enthusiam, and I feel no panic about your obsession. I am confident that you will return to your other projects. And when you do, way back in your head(it will torment you) that little seed of playtime *S*) I think playtime is like that commercial that is on soooo much now. "Your scream just called, it want out". It's an ad for ValleyFair Amusement Park rollercoasters. Can you see why I think it fits us as quilters?? *G*
ReplyDeleteThe respite from rules is excellant from time to time..Keep up the great work..your tutorial is awesome. I'll even try it..*VBS* Hugs, Finn
sounds labour intensive, but a great way to use the strips up :-)
ReplyDeleteThank you so much, Patti, to share your tips and tricks ! Now I can tell my friends that I had a workshop with you, this afternoon !
ReplyDeleteYou are a Queen-Quilter, so prolific ! I'm longing to see your wedding quilt and Broken Dishes Quilt ! You will certainly hear my "oooh!" and "aaaaah!"...
I'm learning a lot with you. Thanks again and friendship threads from
NADINE in Belgium.
Thanks for sharing this way of making HSTs. I just read about this method (or very similar to it) in an older quilt book and couldn't quite understand the process. Now I get it. Next time I want to play with my scraps I will try this method.
ReplyDeleteI am so impressed ! To me the use of scraps seems so "real" in the world of quilting. As though holding on to a fine tradition of use of fabric. The blocks look great done that way.
ReplyDeleteSuch a great idea- I will add this to my to do list- I have a drawer full of scraps, with lots of luck, I could have a great Broken Dishes quilt one day! Thanks for sharing that idea. I look forward to trying it.
ReplyDeleteThanks! :-) Kim
great job Patti! I admire you!
ReplyDeletehugs
laurie
Interesting method. I will definitely have to try it when I get caught up with my current projects.
ReplyDeletePretty cool! I've never seen this before - I'm afraid I'd mess up when sewing all those bias strips together!
ReplyDeleteYour broken dishes quilt is beautiful. I certainly have scraps to use up, and that's good way to do it. This method of bias squares seems too complicated to me, but your results are a good advertisement for it!
ReplyDeleteThank you for sharing that technique! I'm sure I'll be giving it a try in the future!
ReplyDeleteThanks for this techinique Patti!! I had learned a similar (but not quite the same) way to do these too. Your way is just as easy and gets perfect results! I'll definitely keep this trick up my sleeves for any HST project that needs lots and lots of HST's!
ReplyDeleteI tried this method years ago and hated it. It seemed like it just took me FOREVER to get those triangles cut out. But you know something Patti? You have totally inspired me to give the method another try. The accuracy looks perfect and I think once I got into the rhythm of the thing, I would have a huge stack of HSTs in no time flat. Thank you for opening my eyes!
ReplyDelete